Cabinet door installation

I sometimes feel bad for you, my dear readers, that you are still hearing about the kitchen project. Finish up already! I really am trying – for all of our sakes! Monday night I made some serious progress in this department. I moved the freshly painted doors from the barn, helped my brother and sister in law get set up for spraying their cabinets in my barn, and then started installing the doors.

DSC_9266Oh there were few glitches — a few doors that are supposed to meet in the middle that don’t quite, so they need to be sanded down and that part re-painted. A few rough spots in the paint that bugged me- sanded down, touched up. And then this one door that doesn’t work with the new cabinet and hinge configuration.

And then once the doors were on, the next day I started putting the hardware on (because of course I bought that months ago and had it sitting here ready).

So it isn’t done yet, but LOOK AT THIS! A KITCHEN WITH DOORS!!!! AND HARDWARE!!! This feels big somehow. Oh there’s those missing under-the-sink-cabinet doors and that one door that needs to be trimmed. But mostly this place feels like a big, bright, cabinet-doored dream come true.

DSC_9286

Cabinet Door Painting… again…

Once the gray lower doors were painted and installed, it was time to switch over and do the uppers and pantry doors in white. I sanded, filled dents and old hardware holes, sanded the wood putty, wiped them down, got them all set up on plastic covering both sides of my painting booth, and started spraying!! Three thin coats of primer and I used a foam roller on the second coat of primer to make sure to fill the grain with paint. Otherwise it stands out and doesn’t look great. I did the same on the first coat of cabinet paint to make sure the grain got really painted in the cracks. The rest of it works great with the Critter sprayer.

DSC_9165DSC_9171DSC_9168  DSC_9167

I was volunteering Friday evening and Saturday until aroudn 2 pm and wasn’t sure if I’d have time to do anything. But I got home and the doors were calling my name. The weather was glorious! Mid-70’s, sunny, breezy. The perfect day to be out with the barn door open spraying those doors. Booyah.

The puppy proved to be a productivity killer, as usual. With my older dogs, they always know what “out” means and have gotten pretty good at seeing paint and knowing I’m going to make them leave. Daisy has a two second attention span and doesn’t understand “out” just yet, much less wet paint. I’d have my back turned for a minute and she’d dart in, tail wagging dangerously close to my wet doors. I’d start shrieking and waving my arms and it startled her enough that she left promptly (for the most part) and by the end of the weekend, started to understand that meant I didn’t want her in the barn at all. She would show up outside the barn with a ball every few minutes, but eventually caught on that she probably shouldn’t approach me in the barn.

photoshopped photoshopped2

The paint dried very fast for me, so there wasn’t a lot of down time between coats. I finished the door fronts on Saturday night and let them dry overnight before flipping them all over and starting on the backs on Sunday. It was a lot of paint spraying on a lot of doors, but felt SO. INCREDIBLY. GOOD. to finally get them done, and all in one fell swoop.

DSC_9234DSC_9250

I’d been dreading the all encompassing nature of spraying all these doors, so I think it was a mercy that I tackled it after an exhausting week at work, an overly social week on the home front, and then volunteering for a conference Friday night and Saturday. This introvert was ready to throw in some ear plugs and just spray some paint all by my lonesome for a couple days. Add that to the previously mentioned gorgeous weather surrounded by my amazing (though grossly neglected) yard and some crazy dogs, it really wasn’t so bad after all.

DSC_9260 DSC_9252

Cabinet Door Painting

This is the part I remember taking FOREVER when I painted kitchen cabinets in the old house — painting the doors. So many coats of paint. So many cabinet doors! Will it never end??

DSC_7543

DSC_7544When I replaced the sink cabinet a few months back, I didn’t use the doors on the new (used) cabinet because they were not in the greatest of shape. I remember holding up cabinet doors (that I thought were from the old sink cabinet) and thinking how nicely they fit. Great! Yeah, it turns out I was holding up the doors from the adjacent cabinet, not the sink cabinet. Womp womp. DSC_7524

At the end of August, while preparing for my big Irish Park party, I desperately wanted to get some doors finished and put back on. Sometimes it’s the little things, right? I mean the party is mostly outdoors but people will wander through to use the bathroom and wouldn’t it be nice to have doors on the cabinets? Or at least the lower
cabinets? Right. So I pulled a couple long evenings and early mornings and finished painting the lower doors (not that impressive, but it felt like something.)
klassyI had gone grocery shopping after work and came home to find the lower cabinet door s dried and ready to install… and the power out. Argh. This is what cordless tools are for, people. So I fired up the drill and started installing hinges and doors in the mostly dark kitchen. I had a flashlight but it was in the barn and felt like work to go get it. I get to the last set of doors and realize they don’t fit the cabinet I thought they belonged on. Hmm. DSC_8490Must have used the wrong doors on the sink cabinet. So I install those on the cabinet next to the stove only to realize my error of a few weeks ago. The sink cabinet doors do not in fact fit the sink cabinet. GAH. Of course by this time it is truly dark so I snagged the motion sensored light I installed to take Daisy out to pee. Nice Reenie, that’s some serious klass.  
DSC_8488 DSC_8489

So I’ve got 7 out of 9 lower doors installed (but not the ones for the sink because now I need to find new doors to fit there). And of course it all took twice as long because it was dark.DSC_8492

And I couldn’t start priming the pantry doors because the power was out. So much for my overly optimistic plans. As usual, they were overly optimistic and I was left embracing the poverty of revealing my half done kitchen to lots and lots of people – who mostly know me well enough to expect such a display.
#embracethepoverty

Pantry Cabinets

IMG_7764The week between vacations I purposely had a several evenings at home. I cleaned, sanded, spackled, and started the process of priming the lower cabinet doors in the barn. The next night, I was on a roll. I moved the two big pantry cabinets from the barn into my car, from the car, to the deck, and from the deck into the kitchen. These are big, heavy cabinets, and I was super proud of being able to maneuver them myself and get them into the house.

IMG_7765The only hitch was standing it up… oops. I realized I couldn’t get it without another set of hands. Thankfully I have a friend who responded to my “help” text and came right over and stood up both cabinets with me so I could keep going. Thank God for friends nearby! I needed to prime and paint the side of the cabinet that would be adjacent to the other cabinets. So I started that process before bed.

IMG_7777Friday night I was out with friends until late, but managed another quick coat of paint on the cabinet frames before heading to bed. I just want to get these things installed! (Note Suzie’s new napping spot: under the kitchen table where the puppy can’t easily disturb her).
IMG_7783 Saturday was a crazy busy day at home. I got the pantry cabinets installed – not as easy as you’d think- especially because nothing is level or square and the cabinets are different depths. Anyway, I finally got them installed, got the frames sanded and painted, the inside painted, modified some shelves (so I have a place for my cookie sheet pans) and even began filling the shelves. I love it!
Meanwhile my house looks like a bomb went off. Dirty laundry on the bathroom floor, the laundry room floor, rags on the kitchen floor. Tools everywhere. An extra dog for the week. My geriatric dog declining fast. A puppy chewing up the shim I was using for the cabinet installation. Dishes to wash. Ahhhhhh. The DIY lifestyle is not for the faint of heart… or for a person who regularly has people drop in unannounced… oops.
IMG_7771
Regardless, I’m thankful for progress! And having the pantry cabinets in the kitchen and painted feels huge! Wooo Saturday!
IMG_7776

Pre-vacation insanity

Please forgive my backlog of posts. I’ve been composing posts as I go and then forgetting to add photos and actually post them. Meh. They may or may not convince you never to re-do your own kitchen – you’re welcome.  

IMG_7692What I want this post to say is “hey look! I finished my kitchen!” Alas, what did happen was a week of insanity before family vacation, in which a person might reconsider ever vacationing again because of the crazy factor- both at home and at work. That Wednesday I picked up my nephew to have him mow the field. In theory it was a great idea, having someone doing one job while I did another. In practice, this was his first time mowing on a tractor, so I did a lot of instructing and hovering but he eventually got the hang of it. (I just had him do the field, not the dicey parts around the trees or the big hills, we’ll save that for when he’s got a bit more experience).


IMG_7695After he left, I managed to get the dishwasher installed (which still I need to pull out and do one last time because I forgot the insulation). But let me say this: having a dishwasher that actually washes the dishes is TOTALLY WORTH THE HYPE (and the $300 I paid for it and the evening I spent installing it).


The next day one kind brother (and a poor innocent friend who was just over for dinner) and I managed to haul the enormous china cabinet out of my kitchen and into my barn. I am giving up on it. I want to love it. In fact, I love the lines, the curves, and the fact that it belonged to a beloved grandmother who kept her fancy dishes and treasures in it. Alas, it is too big for my little house. There is not a single room it can fit in without dominating the whole room.
IMG_3743So I’m letting it go because try as I might, I cannot get it to work. My sister is going to adopt it when her house is built, so in the meantime it is in my barn. I offered to finish painting it (since I started it), and to help repair the back legs but I cannot keep it. I wanted it to work so badly and I gave it a good try, and it is time to let go. This cabinet is a formidable piece of furniture and I can’t tell you how much I appreciate the brother that agreed to come haul it out of there with me. Once I had decided to let it go, I just needed it out of my way so I could keep going with the kitchen project without it taking over half the room and blocking cabinets that needed painting and wall that needs repair. After all that, it is kind of a relief to have it gone (or at least where I can trip over it in my barn).  Next thing you know, my Jurassic Thursday crowd was arriving (while the china cabinet was still on the move) for a movie and catching up. Love those dear people.
Friday was a BBQ / bonfire at my house for the graduating seniors. I am happy to have a place to host things like this and it is kind of nice to have a party when someone else does the shopping and running of it. It was another late night.
After a week like that, I had no time to do laundry or get ready to go on vacation so I had decided to go up Sunday night instead of Saturday to give me time to get things together- ish. Not to mention the kitchen sink was having issues (since I’d unhooked all the plumbing to install the new cabinet and the dishwasher). If it was just me, I could have left it till I returned, but since people were coming to watch by dogs, I figured giving them a working sink was the least I could do. I got the sink back up and running, sanded, primed and put the first coat of paint on the sink cabinet and the side of the cabinet that was previously blocked by the big china cabinet. And at the end of the day, I met up with a bunch of friends at German Park. Such a terrific way to end a long day of work at the house, and a great way to begin vacation week. Mmmm bucket o’beer.
Sunday was another flurry of Mass, some frantic cleaning, lots of laundry, softball, and then racing home to load the car and off to vacation. Mmmm vacation.
Part of me was sad to miss a single minute up north with the gang but I have no regrets for the time at home and it made it easier for me to relax on vacation without worrying over the state of things at home (worrying about leaving anyone with a geriatric dog and a puppy is bad enough without worrying about plumbing that isn’t functioning).

Perfect evenings

IMG_7679Last night felt like the perfect summer evening. After work I played softball on a friend’s team and we won (for the first time this season). The evening was gorgeous! Sunny, breezy, not too hot.

IMG_7672

So fancy

I arrived home to three dogs who were, as usual, excited to see me. We romped in the yard for nearly an hour. I’m still trying to get Daisy to bring the ball back, but in the meantime, at least she chases the ball all over the place and expends some energy (and so do I). The dogs had a picnic dinner on the deck, because we are that fancy. I made and ate dinner that involved Asiago cheese and fresh tomatoes, always a win.

And finally, I made some more progress on the kitchen. Less than a week in, I’m feeling desperate to get the kitchen plumbing back into a functional place. Currently the laundry room sink is full of dirty dishes (because I was too busy working on the kitchen to wash them). The clean dishes on the washer need to be put away but the kitchen disaster makes that seem futile. And I can’t do laundry because of that situation and the rags and dirty clothes are piling up. Clearly I need to get the kitchen back into working order before I leave for vacation (for the sake of the lovely people watching my house and dogs).

IMG_7681

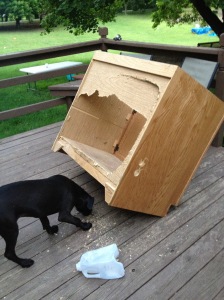
I dug out the new used cabinet from the stack of cabinets in the barn (another story for another day). I had gotten this set used (for the pantry cabinets, which I ended up giving away) and this sink cabinet wasn’t in the best of shape. The bottom was a bit saggy and the back had some holes. I realized in order to make it work with the existing plumbing, I would need to remove the entire bottom and back and then add in new supports once it was in place. The doors didn’t quite match the other lower doors but the doors from my old sink cabinet fit perfectly. Yes please.

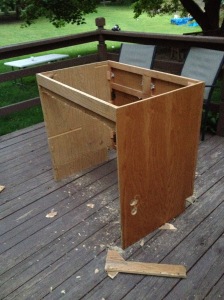
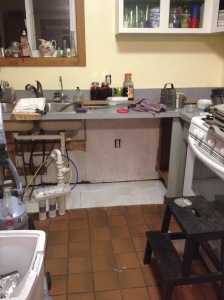
I hauled the cabinet out of the barn and into the lawn tractor trailer (I love that little thing) and up to the house. I made the modifications on the deck as the light was fading with my trusty Ryobi sawsall. And I prepped the under the sink area for the new cabinet – removing a couple 2×4 pieces that were in the way and part of the crumbling drywall behind there. The bad news: the drywall was crumbly, the good news is that there insulation and wall behind it wasn’t moldy or damp at all.

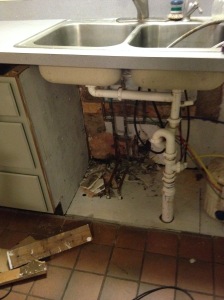
I detached the plumbing from the sink and propped the counter up on 2x4s so I could slide the new cabinet underneath, pretty impressed with that brilliant set up and mostly just happy to be able to get the cabinet in place without waiting for help. It still needs to be sanded and painted, and the plumbing reworked underneath, but I’m pleased as punch to get the cabinet in!! I also took the dishwasher out of it’s packaging and read through the instructions enough to know that I need to buy a power cord before I can install it. Hopefully tonight. Imagine if I could have a sink AND a functioning dishwasher in there?!?!! One can only hope.

IMG_7669

Under the sink area dried out and painted with kilz

IMG_7683

Crumbly drywall mess

IMG_7685

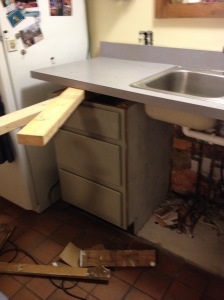
My very high tech method of lifting the countertop to get the cabinet in place (don’t the drawers look nice in gray though?)

IMG_7687

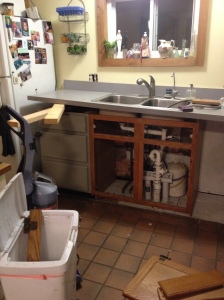
Hey look! Sink cabinet installed! Booyah!

Kitchen Part II

We last left the kitchen project back in April, right before someone got a puppy and all progress seemed to come to a screeching halt. Now that the puppy is six months old and potty trained, it seemed like it was time to keep going with the project. This past weekend was the first really hot weekend in a long time. I was initially planning to do yard work (which I can never seem to stay caught up on) but it was much too hot for that. So I decided to take the next step in the kitchen: start painting the lower cabinets.

DSC_4435

What do you mean ‘trouble’?

Of course, the last cabinet painting I did was uppers, which is out of reach of tails and curious noses. And that was before I got a puppy. Apparently I was living the kitchen remodeling dream and didn’t even know it! Remodeling with a puppy underfoot, while entertaining, is not convenient at all. And it was so hot outside I couldn’t just banish them to the yard. So there was some crazy shenanigans underfoot and some time spent in the comfort of their air conditioned crates.

DSC_4424When I moved in, the under the kitchen sink cabinet had a water stained icky bottom (that was a replacement- clearly the actually cabinet bottom was long gone). I’ve had a few leaks over the last two years because the sink plumbing is ridiculous (a million connections that seem loose in the stack). Anyway, I knew pulling that cabinet out was going to be bad news but I’ve put it off this long and knew I was going to have to just do it. Not to mention that I have the replacement cabinet (a couple inches wider to accommodate the farm sink I plan to get as part of the next kitchen upgrade phase). Mmmm farm sink and butcher block counters. Someday. Anyway, the new (used) cabinet is taking up valuable space in my barn and if I’m going to be painting cabinets, I should just install it, paint it, and be done with it, right? Of course right.


I also finally bit the bullet and bought a new dishwasher to replace the old one that doesn’t do much in terms of washing the dishes, which seems like it’s one main function. There was a decent 4th of July sale and I bought a low range model that will hopefully do the job. It arrived at the local Blue store and was ready to pick up last week. Clearly the stars were all aligning to begin this next part of the project.


So Saturday morning I started trashing the place working on it. The dining room table was covered with the contents of the drawers. I set up a table on the deck to clean, sand, and prime the drawers. (And then mid-morning, after the primer was dry, I looked out and noticed the sky had gone dark and had to drag everything including the table inside just as it started raining). Anyway, I did get all the drawers cleaned, sanded, and painted (one coat of Zinsser, three coats of cabinet paint).
DSC_4430DSC_4439
DSC_4440
I cleaned, sanded, primed the lower cabinet boxes (except the sink cabinet, which was getting removed). I removed the dishwasher to find that the floor was damp and the wall behind it moldy. I even found my long lost muffin tins where they’d fallen from the corner cabinet next to the dishwasher. It was my first go at taking out a dishwasher and felt like it took way longer than it should. And of course, finding the moldy wall behind it will take the wind out of your sails pretty fast. Bah. DSC_4448
Then I dug in and removed the sink cabinet bottom to find it was as bad or worse than I feared. Damp, icky, buggy disgustingness under there. Shudder. And holes where the mice clearly get through. It sure doesn’t look good. Old plumbing hacked together with a history of leaks (a long history clearly). I used my “phone a friend” card to call my dad. I rarely call him in on things but this seemed like a good one to get some dad advice. He came over and agreed it didn’t look good and that the plumbing stack should be redone. He felt the boards and we agreed that we should dry it out for a few days and see how it does. It looks like the subfloor is damp and stained but not rotted through and probably salvageable. I’ll dry it out and see what happens. DSC_4451
DSC_4454
My dad said “we” could and should re-plumb the stack (I hope that means he will help because I am no genius at plumbing – I mean I can do simple repairs, but reworking how all the connections fit together? Not my department).


I spent an inordinate amount of time unscrewing the counter so it is removable now. For as half ass as the plumbing is and the sink that wasn’t installed at all when I moved in, those counters were VERY secure (screwed in all kinds of hard to reach places). I plan to screw them back in exactly two places since I plan to replace them in the next year or two anyway. Next up I can install the new sink cabinet and the new dishwasher.


DSC_4458It is amazing how long all these things take. DSC_4460I worked on it for about 12 hours on Saturday and then a couple hours Sunday to do a final coat of paint on the cabinet boxes and to haul the old dishwasher and cabinet out to the trash. I also managed to get the wiring done for the microwave / hood combo (which has been sitting in my sewing room for at least 6 weeks) and I installed the mounting plate. Now I just need another set of hands to install it.
By Monday night, with a fan blowing on the under the sink area, everything was dry (and still gross but slightly less gross). I swept it, vacuumed it, cleaned the wall and floor with vinegar, let it dry again, and then painted it with a coat of Kilz. I will need to seal the seams with something to keep the mice out, but in the meantime, it looks so much better and I am pleased that none of the boards in the subfloor needed to be replaced.

DSC_4438

Done:


Paint lower cabinets and drawers
Remove rotting sink cabinet
Remove dishwasher
Wire plug for microwave / hood
Install mounting plate for microwave
Dry out and paint wall and subfloor
Stay tuned…

The Kitchen Begins

I’m sure you’ve all been wondering when I would *finally* get around to updating my kitchen– oh you weren’t? Maybe that was just me. Anyway, it was time. Really I should have finished the upstairs hall, but it doesn’t always work that way. Crazy was raring to go and started emptying the upper cabinets before the Sane Reenie could convince her to finish the upstairs hall first.

Ahem. This is my brain dump post of the things I want to do. It will certainly evolve as the project goes on, but it is always kind of fun to document my original plans (so we can laugh at how far I deviate from it).

Kitchen Idea Board1

Phase One: 
Walls: very pale yellow (summer smile)
Upper Cabinets: Remove, add 1×2 to top, reinstall at ceiling, add crown molding to top, paint white (Sherwin Williams Alabaster White)
Lower Cabinets: Gray (to match my dining room chairs) (Valspar wet pavement gray)
Hardware: black
Repaint the ceiling flat white
Paint tile floor dark blue with stencil on some tiles (scattered throughout- not too busy though) (dark blue)
Add pantry cabinets
Install pull out cabinet organizers in lower cabinets
Replace cabinet above stove with smaller one
Range hood microwave
Phase Two: 
Ikea farm double sink
Butcher block counter tops
Subway tile backsplash
Paint / replace bar stools
Remove wall between kitchen & dining room
Add beam
Drywall in dining room
New dishwasher
Anyway, the project has begun. Prepare to be inundated with boring kitchen updates for the next looooonnnnggggg time.